
How to build MonotrOndes part 1
This post is updated!
At first I have to give credit to my twin brother Kalle. He came up with the name MonotrOndes.
My video has been very popular. I thank you all for your nice comments!
Someone even asked if I could build and sell these things. Maybe if there is enough people willing to buy them. I don't even know if it's legal to sell modified synthesizers without permission from manufacturer like Korg.
Pitch Control Electronics
I assume you know a little bit about electronics and components. You should also understand that if you mod your Monotron, you loose all warranty! So please be careful and don't blame me if something goes wrong.
MonotrOndes is not using the original ribbon controller. There is a connector from the ribbon controller to Monotron board. You can disconnect the ribbon from there.
I removed one SMD resistor from Monotron's PCB. Instructions for removal
http://beatnic.jp/manuals/monotron-midi/midi-kit.html
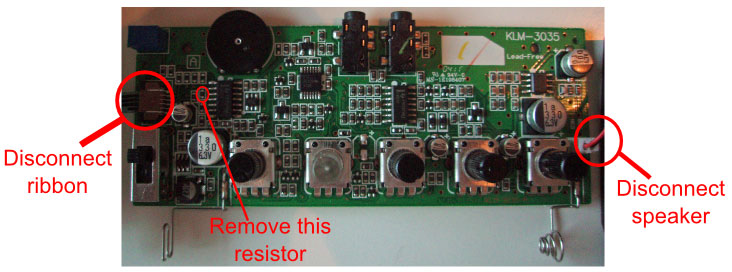
After removal of the ribbon and that SMD resistor I found out that monotron was playing continuously - exactly what I wanted. I don't know if it's necessary to remove that resistor. There might be an easier way to mod Monotron to play continuous sound.
For controlling pitch you will need two potentiometers - a trimmer (at least 47k) and a multiturn pot (100k). Of course you can use a normal potentiometer instead of a trimmer.
In the circuit the trimmer behaves as a variable resistor that sets the range of the pitch control. When you have found the right value for the pitch range you don't have to adjust it anymore. That's why we are using a trimmer type pot.
The multiturn pot's value changes when playing. Together the trimmer and the multiturn pot forms a voltage divider circuit. Monotron uses 3 volts to operate but there is internal circuit that magically (not really!) outputs 5 volts. The point in the Monotron PCB that outputs 5 volts is called VCC. That 5 volts is feeded to voltage divider that changes voltage value to smaller values. That divided voltage output is connected to pitch CV point in the Monotron PCB.
Now we have voltage controlled pitch!
 You can see the important solder points in this new picture! Check out also a secret audio output point that bypasses Monotron's own volume pot. :)
 Here is a schematic

Here is a picture of I/O connections

Hi :)
ReplyDeleteThis is a grat project, it's amazing how you did it.
Thank you very, very much for your descriptions, I'd really love to own an Ondes Martenot, but since it costs 12,500... So thanks for showing how to make one by yourself :)
It took me a bit to undestand everything since I have no idea of that stuff, but I think I got it now, and I wondered of you could answer a few questions.
How did you connect the parts of the Monotron to that box? So what have you done after you had the new circuit?
And is there any posibility to do all this in an external circuit so you can usw it as a controller for a synthesizer? I really have bo idea of stuff like that, so sorry of my questions are stupid...
Thank you very much again.